Bucking the #MARCHintosh of time
I bought this Apple PowerBook Duo 230 at a car boot sale, circa 2006. I’d always wanted a laptop, of any description, as a teenager. It was something to aim for, but something I thought I’d never own. A dream present that I never expected but also would never realistically get, for any birthday or any Christmas.
Finding this for £10 brought the dream literally within my grasp. The seller on the car boot stall was very honest, told me about how they’d used it for university assignments, that it was a great laptop, but now it was just surplus to requirements. “Perfect!” I thought, as that’s exactly what I wanted it for, being in uni at the time myself.
However, as a lifelong PC user (still to this day), there were a few hurdles to overcome. I could get data on to it via the keyboard, I suppose, but how do I get it off again? I remember teenage-me rummaging through Maplin and PC World for the right cables, and somehow actually finding an ADB to 9-pin RS232 serial cable. It fitted in the holes either end, but all of my crude attempts to get it to talk to my PC utterly failed.
On a family trip, we called in to see my uncle and auntie near Birmingham, and there I was, in their kitchen, showing off my new laptop, totally oblivious to the fact that they’d bought me one. I was – and can still be – very literal, and I’m sure my uncle asked me if my PowerBook Duo would be everything I’d need, and in a matter of fact way I responded that I couldn’t possibly imagine needing anything else. I’m not sure if my uncle said it aloud, or in body language – “I guess you won’t be wanting this, then?” – but a large leather bag appeared. Inside it was a brand-new HP Pavilion ze4800.
How is this relevant to a blog post about repairing my Mac? Well, it is and it isn’t. In some ways it’s more of an aside. But in terms of feeling sentimental about restoring these old machines, it’s very much part of the same theme, interwoven. Of course, the HP has far more sentimental value to me, as a gift from my uncle and auntie, and I did manage to successfully restore it (there were both bad and good tears). That success spurred me on to see if I could manage it again, with the Mac this time.
Most of my retro computers are scattered about the place, unfortunately. No, I don’t mean they’re literally in bits, but you have the main unit here, the disks there, the power supply somewhere else, proprietary cables buried amongst a mass of cables in one of any number of miscellaneous bags…you get the idea. By sheer luck, though, while looking for my Commodore Amiga A600 (which I still can’t find), I saw my PowerBook looking all forgotten in a corner of the attic, and the power supply also turned up nearby.
So, I plugged it in for old times’ sake. A few seconds went by, uneventfully, with the laptop not powering on, then I lifted the power supply to my ear to hear if it was doing any familiar mains hum, and bang…OK, it was more of a loud pop, but it timed itself perfectly to be right next to my ear, so it felt (and hurt) louder than it was.
My first thought was “well, that’s that, then.” But after the ringing in my ears stopped, I remembered hearing about “reefer caps” – at least that’s how I (mis)heard it – turns out RIFA isn’t a person who mainly goes surfing near coral, but a Swedish capacitor manufacturer, and apparently these capacitors have a habit of being the first point of failure in tech of this age.
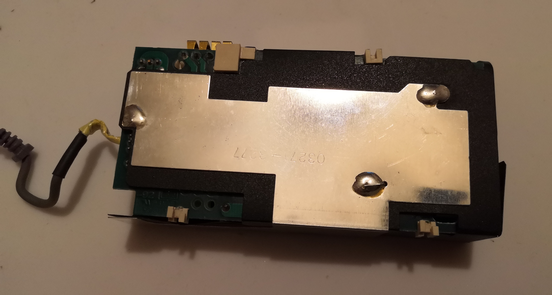
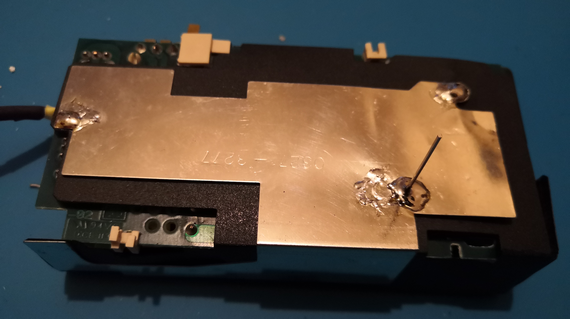
When I finally got inside the power supply – which was no mean feat, and involved lots of patient but persistent prising with a screwdriver – sure enough, the RIFA capacitor had blown its top, but luckily without any obvious damage to anything else.
Even more handily, all the broken bits were still legible, and I managed to order a like-for-like new(er) replacement from CPC.
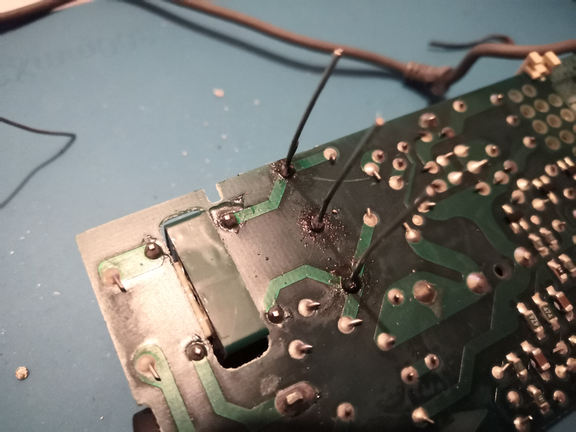
So, all I had to do was unsolder the legs of the old capacitor, and resolder the legs of the new one. Easy, right? No, of course not. Everything is so tightly crammed into this power supply, so just getting the innards out took time and care. And before I could get at the solder on the main circuit board, I had to desolder the ground plate from one of the legs of said capacitor, the earth pin of the IEC C14 (“kettle”) socket, and a grounding terminal on the board.
Then I set aside the ground plate, and tried my best to keep the now-brittle-with-age black card intact (that was between the ground plate and the circuit board, and presumably was very necessary for keeping them insulated from each other).
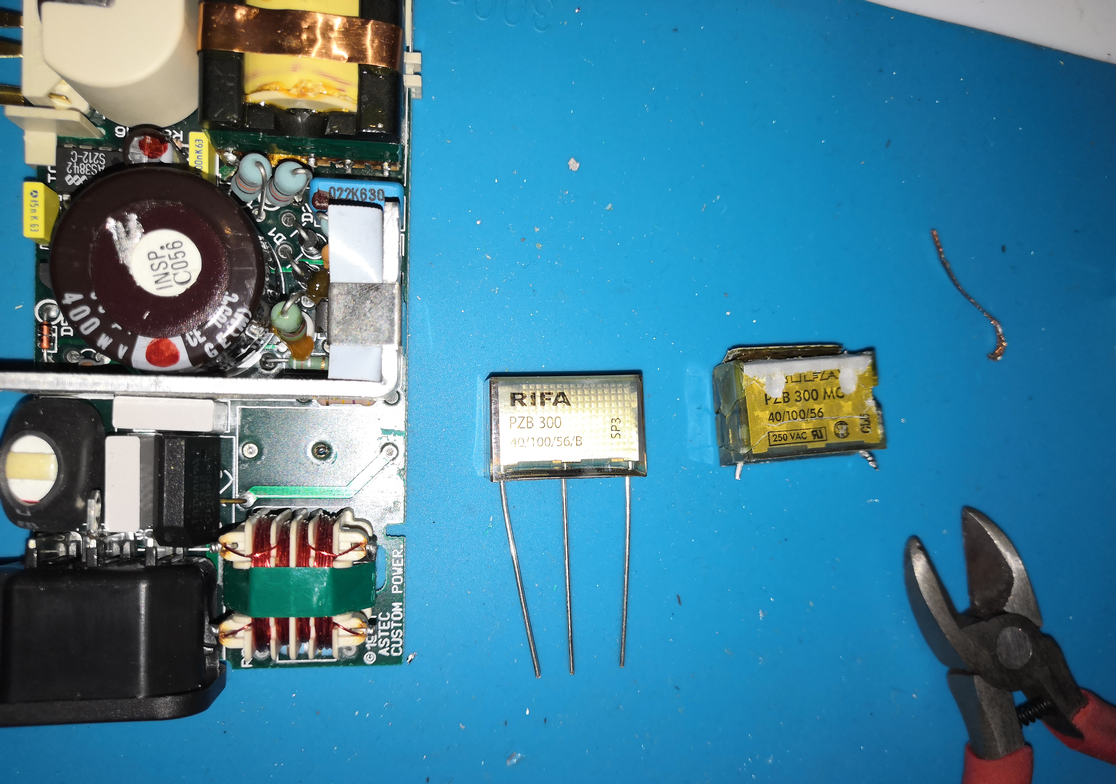
Then I snipped off the old one, and tried to ensure I installed the new one the same way around, even though I was fairly sure that the polarity didn’t matter as it was an AC capacitor. I also absent-mindedly tried and failed several times to solder the middle leg onto the circuit board – failing because there was no pad to solder it to – and then the penny dropped, that the middle leg just passed through the circuit board in order to be directly-soldered to the ground plate.
And there we go! As long as we never ever look at the underside again, this looks like a decent repair! A brand new unblown RIFA cap, looking like it’s always been there.
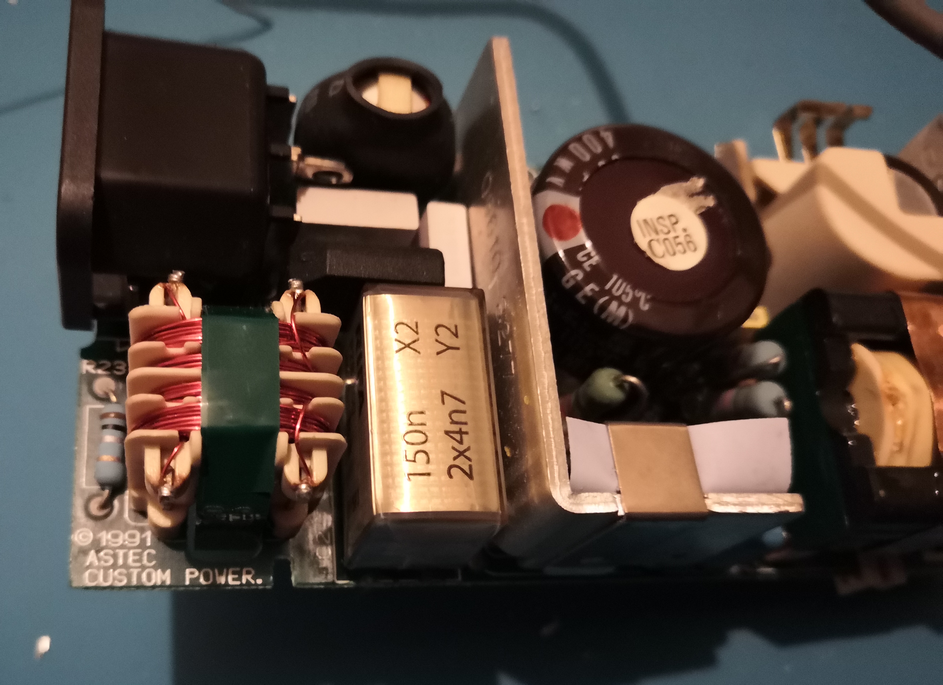
There were a few casualties, however. I couldn’t get all the plastic support bits back in (I still have them in a bag), and I lost one of the four metal fins (I’ve put it back in so that it looks right aesthetically from the outside). But I think all the essential parts remained intact.
I snipped off the middle leg of the capacitor after soldering the ground plate back on, and then it was just a case of snapping the case back together. But nothing snapped. Nothing clicked. Nothing secured whatsoever. I just had two halves of a case. The little hooks that popped out of the case on hinges to coil the cable around refused to stay put, no matter how tightly I taped the case together. Also, I know I’m a novice, but tape made the whole restoration look so shoddy. But at least it was enough to test that my repair had worked, and it had!
I couldn’t let it end there, though. I might have missed the end of #MARCHintosh 2023 by two months, but after some patient gluing along the seams, and carefully reseating the springs and the hooks, it looked a lot better (apart from my screwdriver-prising marks, but maybe I can gently sand those in time to improve the appearance).
Hopefully this gives you an idea of what you’ll need to do if your Mac PowerBook power supply blows, and even though none of my mistakes were catastrophic, if you can avoid them you’ll have an even better restoration by the end. I’m just chuffed that my 32-year-old Mac is no longer relegated to the attic, and lives to fight another day. The screen on it is still good, and the spinning hard disk also still works without complaint, though I am looking at pre-emptively replacing it with a BlueSCSI eventually.
Posted on March 22, 2024, in Uncategorized and tagged Apple, capacitors, computer, computing, diy, electronics, Mac, Macintosh, MARCHintosh, power supply, PowerBook, PowerBook Duo, PowerBook Duo 230, repair, retro, technology, vintage. Bookmark the permalink. Leave a comment.

Leave a comment
Comments 0